Siding Installation: Guidelines & Best Practices
Pioneer Millworks wood siding, shiplap, and Shou Sugi Ban wood cladding is made in the USA and offers protection from the elements while providing good looks, texture, and color. To achieve the aesthetic and performance our cladding is known for, proper installation is essential and we hope this brief overview will lend a helping hand.
First and foremost we recommend that all our products be installed by a reputable, qualified, professional installer. As with any construction project, there are many nuanced skills needed to yield the best results and long-term product performance. These friendly instructions are just a guide and are superseded by the building codes in your area.
For Accoya® products please refer to their installation guide at accoya.com.
Overview - Lets get this project started!
Recommended Materials List:
- Furring strips: typically— 1 1/2" to 3" wide by 1/2" to 3/4" thick strips of solid wood cut to appropriate lengths for your install
- Furring Screws: No. 8 flat-head wood screw, 1-1/2" long, 316 Stainless Steel, auger point
- Siding Nails: 5/16" head, ring shank, 6D Penny Size, 2" Long, 316 Stainless Steel, diamond tip
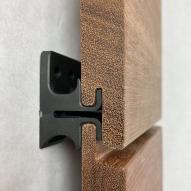
- Cor-a-vent SV-3 or equivalent siding vent
- Touch up finish
- Vertical Installations:
- Cor-a-vent Sturdi-Batten or equivalent
- Or enough furring at 1 1/2" to 3" wide by 3/4" thick for a lattice
- installation (see above)
- Optional: Trim for windows, doors, other openings
Installation Best Practices - The Step by Step.
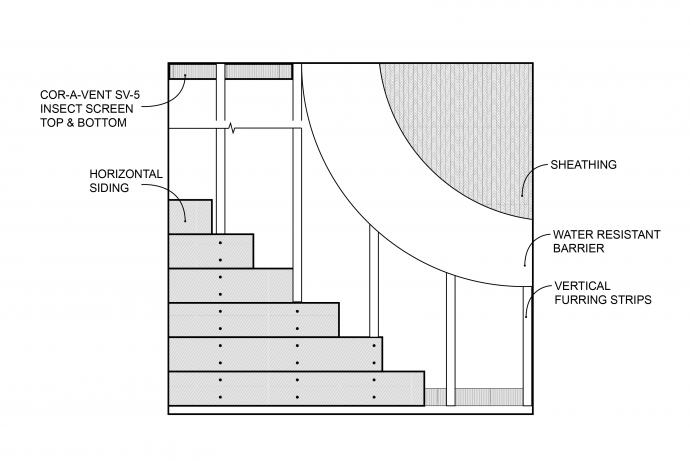
Starting with a sheathed surface (typically covered with a weathertight vapor barrier), installation has five major steps.
Step 1: Acclimation – Prior to installation.
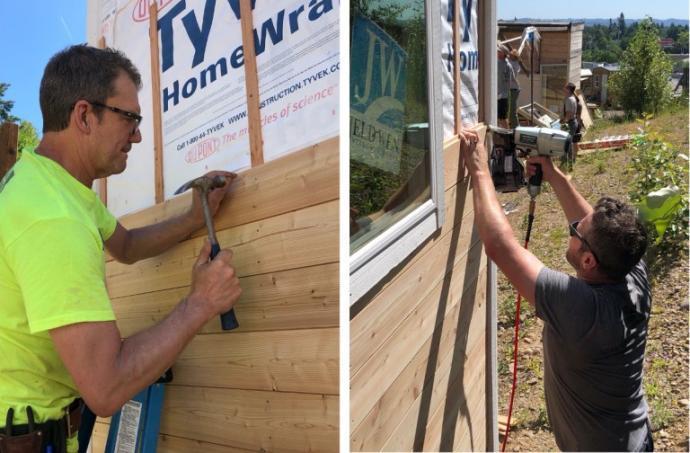
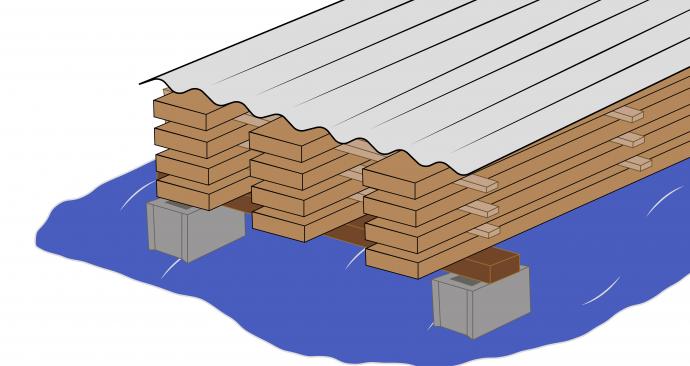
Don’t skip this step! Acclimation is key to minimizing or preventing wood movement. All siding must be un-bundled and acclimated in the environment where it will be installed for 10-14 days prior to instillation and must also be protected from moisture with good air circulation. Using a canopy, carport, an open garage, or a setup like the image above can be easily used for great results. Skipping this step or cutting the acclimation time short can cause gaps, cupping, warping, or buckling and can also cause damage to the boards as they move against the fasteners. Also, it is important to remember not to leave stacks of siding horizontal and exposed. Taking the time to do this part right will make your installation smoother and our natural wood products will preform better long-term.
Step 2: Preparation – Prior to installation.
Maintaining a clean and organized workspace will help reduce the possibility of damage to your siding. Start by organizing siding by length and width (if applicable). It is always a good idea idea to wear appropriate work clothes, gloves, masks and eye & ear protection. Cutting wood will of course create sawdust and our Shou Sugi Ban products will shed some soot from cut ends and edges, so plan on getting a little dirty. Siding can be cut with conventional woodworking tools like circular saws, and miter saws but make sure your cutting tools have sharp blades, and back the wood where necessary to prevent blow out.

Step 3: Install Furring Strips - Let it breathe!
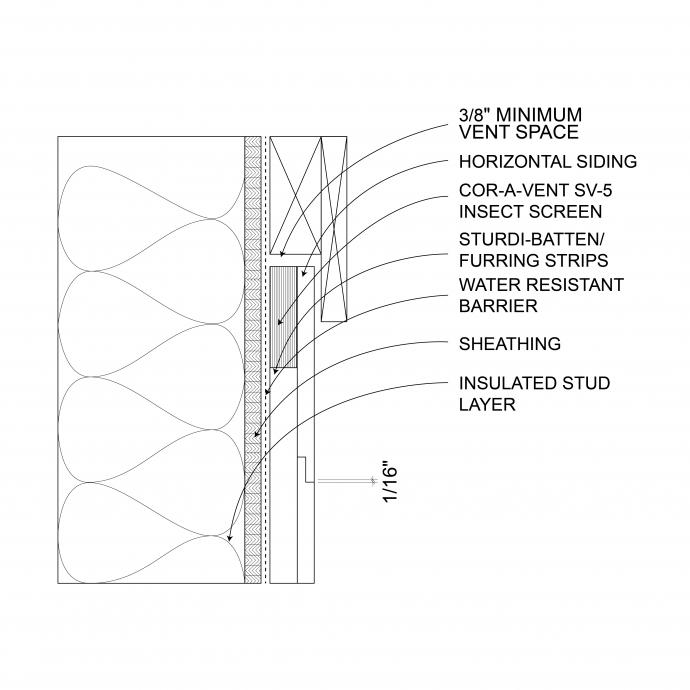
The furring strips, also referred to as battens or strapping, prevent direct contact of the wood siding with the weathertight vapor barrier, allowing it to ‘breathe’, preventing rot and product failure. We recommend using 3" wide by 1/2" thick solid wood strips for this purpose. Strips should be at least 3/8" thick for the minimum allowable air space. If you are installing over ridged insulation use 3/4" thick furring strips. It is important to allow moisture to run down to the bottom and out so furring strips should be arranged such that they do not collect water behind the siding. With any layout the main goal is to ensure that there is an open space for venting and drainage behind the siding and at the top and bottom where siding will be installed.
A. Installing Horizontal Siding
We recommend laying out the strips vertically with 12" of space between them.
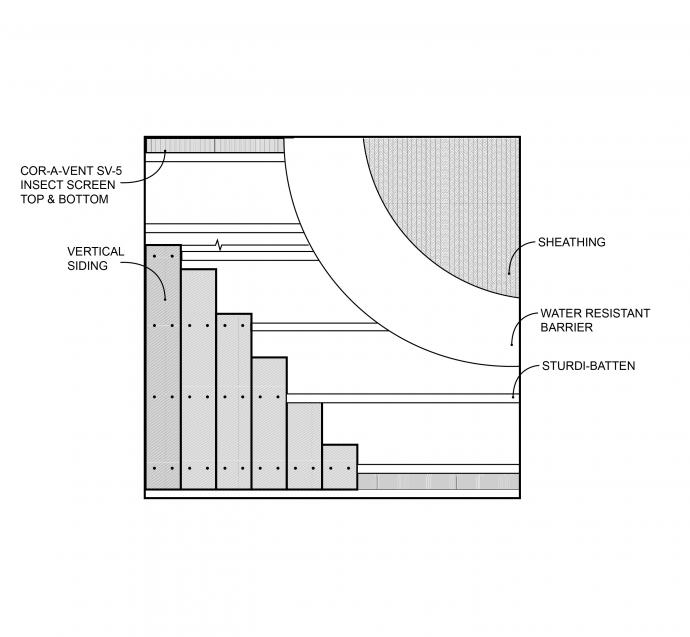
B. Installing Vertical Siding
When installing your siding vertically, we recommend two options:
1. Cor-a-vent Sturdi-Batten, or similar pre-made furring strips which allow water to drain through the strips. Install the strips horizontally, again with 12" of space in between them.
OR
2. Use the wood furring strips and install the furring vertically first. Then install another set of furring strips horizontally on top of the first set. This is called a lattice installation. Spacing should be the same for each of the vertical and horizontal furring strips at 12" of space in between them. With lattice installation, we recommend that the furring strips are 3/4“ thick to provide additional stability.
Windows or other openings:
Furring should be installed around windows and other breaks in the siding to allow for attaching the ends or edges of the siding. These strips should sit about 1” away from the obstruction. Make sure there are breaks in the furring strips that will allow venting around the window or other opening.
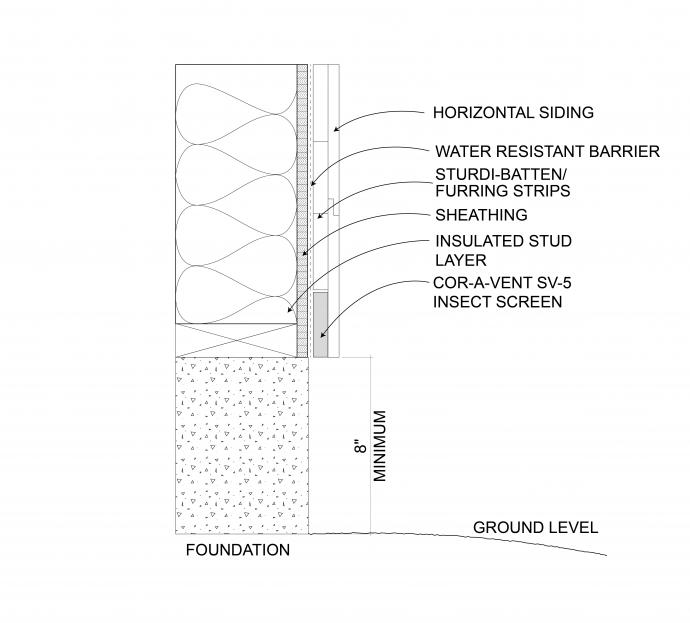
Near the foundation, make sure that the siding will be installed 8” to 10” above the ground to keep it out of the rain splash zone.
Screw it!
Be sure to install the furring strips using screws that go through the sheathing and into the wall studs when possible. We recommend a No. 8 flat-head wood screw, 1-1/2” long, 316 Stainless Steel, with an auger point. The screws should be driven in so that the head is flush with the top of the furring strip. If there is an additional component between the furring and the sheathing, like a rigid insulation, longer screws will be needed to accommodate the additional depth, and furring strip thickness should be increased to 3/4”.
Step 4: Install Venting - Let it flow!
The furring strips will help space the siding away from the moisture barrier so that water can drain, and the siding can dry out. If left open, this space can be a place for insects to gather so it is important to use a venting material that will allow moisture to pass through while keeping out anything that might slow water flow or damage the siding. We recommend Cor-a-vent SV-3 or a similar material for this purpose. After the furring strips are installed, fill the top and bottom areas between the strips with the venting material per their manufacturer’s instructions.
Step 5: Install Siding - The Main Event!
Our shiplap profile material can be installed either vertically or horizontally. (Make sure that the back tab is going up when installing horizontally.) We recommend that some space is left between the boards to allow for natural expansion and contraction. Approximately 1/16” should be sufficient. (For both square edge and shiplap).
Siding boards should be attached to the furring strips with stainless steel, headed, ring-shank siding nails with a diamond tip, hand nailed or fired from a pneumatic nailer. At least two nails per furring strip should be driven through the face of each board approximately 1” from each edge to minimize cupping and 1-1/2” from the ends.The wood will naturally expand and contract with moisture changes. Leave at least 1/2” between the siding and any obstructions/openings like windows and doors. These gaps can be covered by trim pieces depending on your design.
NOTE: Wood siding does not require using caulk for sealing and it can have a detrimental effect of trapping moisture and contributing to rot.
Finishing & Maintenance
American Prairie Reclaimed Siding:
Our American Prairie products come standard with their original patina surface, no man-made finish or sealant. Prior to being salvaged, this material lived a previous life outdoors and exposed to the elements. The weathering and UV enhancement that has given these products their patina and character has also toughened up the wood and removed the softest, most rot prone fiber. Site applied sealers can provide additional protection to this material but is not required–and may affect the overall look of the product.
Shou Sugi Ban and Siding & Shiplap:
Our Siding & Shiplap and Shou Sugi Ban products all come standard with two coats of sealer applied to the face and one to the back. Some of the soot layer will rub off when handled, this is normal. These pre-finished products require regular maintenance in the form of a refresh coat of finish every 3-5 years, as needed, to prevent wood degradation.
Touch up and Sealer:
Touch-up kits are available upon request to treat cut ends/splices. All sealer products used are available for purchase direct from the manufacturer.
Special notes:
Please, do not pressure wash wood siding. It will remove the finish or patina and create a visually uneven and structurally unstable board. If lawn and garden sprinklers are used near the siding, make sure that they do not spray water on the wood siding as it will cause uneven aging.
Accoya® products that are covered by warranty must be installed in accordance with the official Accsys® Accoya guidelines to meet warranty requirements. Please see pioneermillworks.com/accoyainstallation.